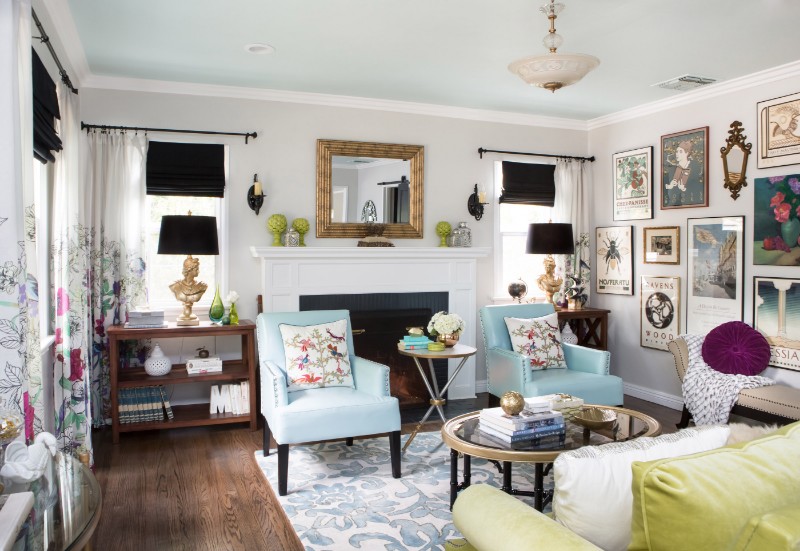
MY OFFICE PROJECT IS FINISHED! BUT NOT WITHOUT PERIL
I have to say that I am thrilled to be on this side of my office project for the One Room Challenge™. It was a ton of fun and I couldn’t be happier with how it turned out, but boy did it put me through the ringer! You may be thinking, “but you are a designer, so you make quick decisions and everything works out perfectly, right?”. Um. No.
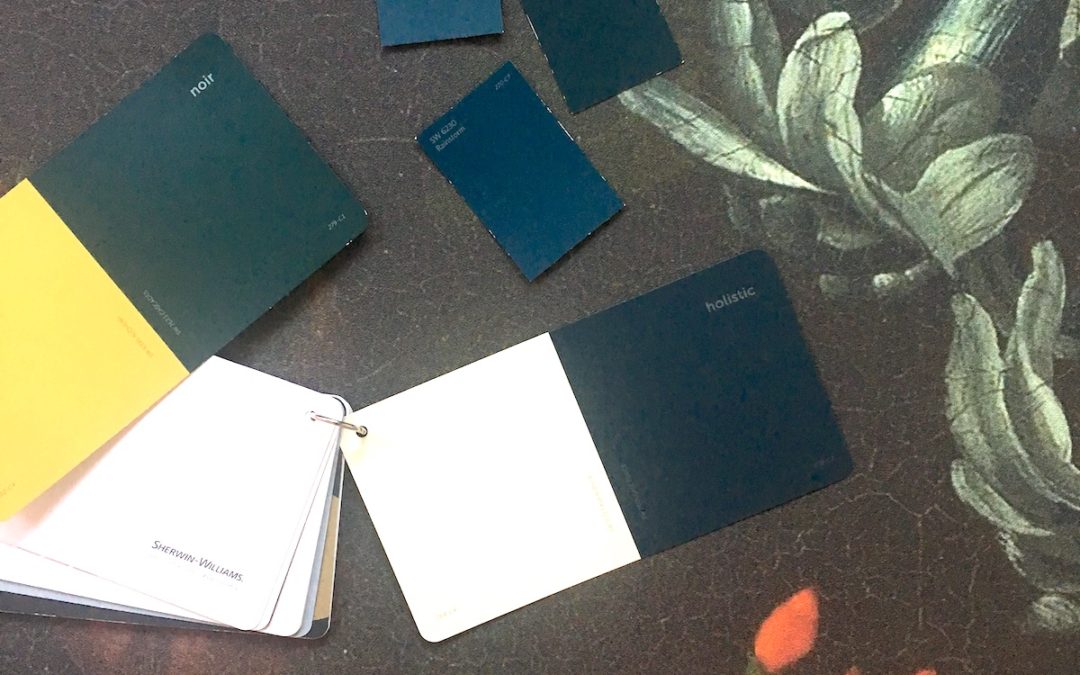
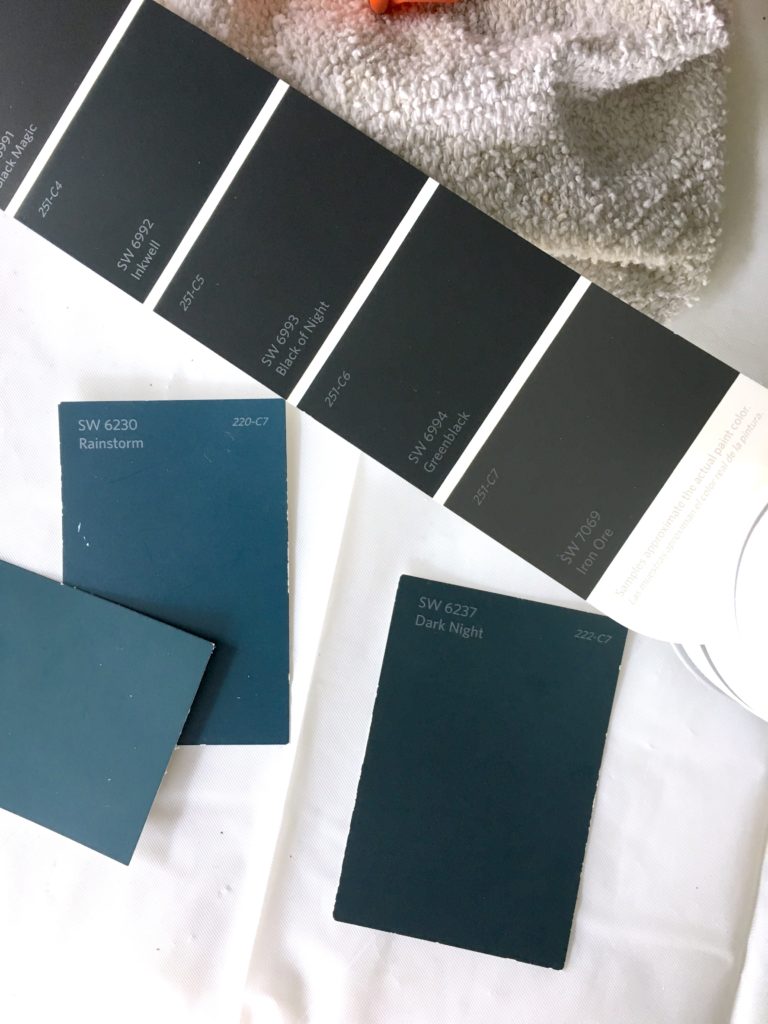
I would say that choosing my paint colors was the absolute biggest challenge for this office project. First of all, I started out trying to choose my colors without the wallpaper, because it was coming from the UK and I didn’t expect it until about 5 days before the reveal. So….I made this video and you got to see how I attempted to choose colors based on my perception of the colors in the wallpaper mural from what I saw on the computer. So, I ordered my first color from Sherwin Williams. The green Cascades for the wall color on the other 2 walls. I also ordered 3 different teal colors {{ Rainstorm, Seaworthy & Gale Force}} in samples to try on the doors.
SO WHAT HAPPENED NEXT?
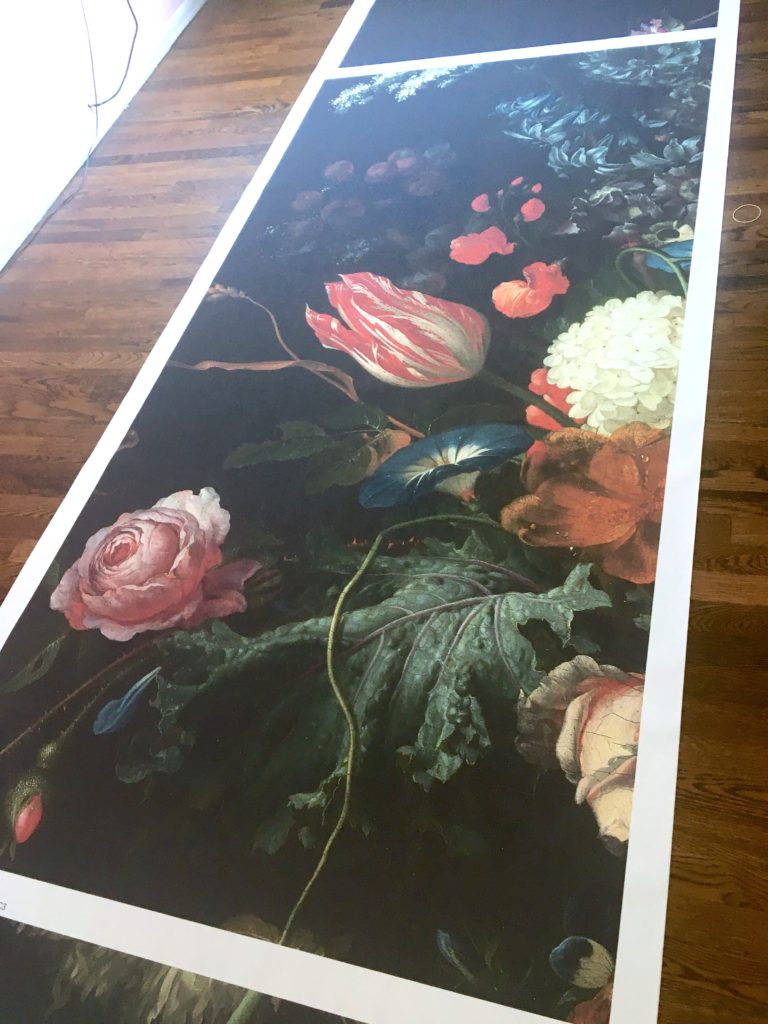
Literally, 1 hour after I got confirmation from my rep at Sherwin Williams that my paint was ready, much to my surprise, the wallpaper showed up!!! It was my lucky day, but of course I started to second guess my colors as soon as I saw the actual wallpaper. The colors were much more muted than I expected. Uh oh. What do I do now?
So, I picked up the gallon of Sherwin Williams Emerald Paint in Cascades in a eggshell/satin finish since they already made it. I started putting it up on the wall, and I’m thinking…..this is awfully teal. Isn’t this supposed to be green? So after my 1st coat is on the wall, I paint it on the large color card I have for Cascades to compare, and sure enough….the paint is much more teal than it is supposed to be! OMG. I also noticed the next morning that it was VERY shiny. So, I contacted my rep at Sherwin Williams and they figured out that somehow the formula was off in the computer.


MORAL OF THE STORY?
TIP: Always have them partially paint the color chip with your paint and dry to make sure it’s an exact match. Of course I knew this already, but I was in a hurry. See why never skipping steps is so important?
I also had them give me the matte sheen this time, so it was actually a blessing in disguise. I painted the 2nd coat with the new paint & sheen and it was SO MUCH BETTER! But….I didn’t have the wallpaper up yet, so I still wasn’t sure. I moved forward and painted the 3 blue sample colors on the doors (Rainstorm, Seaworthy & Gale Force) and went with Rainstorm because I liked how the color popped.
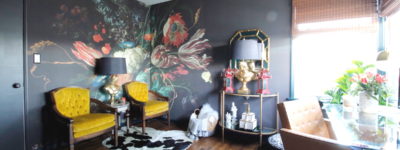
Next, I cut the panel of wallpaper that would go next to that blue door and I thought,….uh oh. I actually don’t like any of the blues that I chose. One was too muddy, the other one too gray, and the other one too bright. It’s like Goldilocks and the 3 bears, only this Goldi didn’t like any of the porridge. If you notice, in the very first photo at the top, I have 4 blue colors. Dark night is the only one I didn’t get a sample of. The reason was that I didn’t think it would have enough contrast against the Cascades because it had so much green in it. Then I started to rethink that.

This is when I decided to take a pause on choosing any more colors until the wallpaper was up. I needed to see the brown up against the green and that gray gap above the door to be filled in. It was throwing me off. So, New Generation Wallcoverings came to my rescue and put it up. You have to see the magic of how they installed this paper with invisible seams. {This link takes you to my instagram highlights which will show you the whole project in stories from start to finish} You might just learn something and feel confident enough to hang your own wallpaper, or you will be like me and bring in the experts to make sure it gets done right. I mean…..wallpaper ain’t cheap y’all.

Okay, so once this was up, I stepped back and knew that blue didn’t work on the door. So, I decided to try to match it with a paint color from SW, which didn’t work, so instead they custom matched it to the wallpaper. Problem solved! BUT!! I still didn’t think the blue worked. Even though it matched the blue in the flower, it competed with the wallpaper. This room could only have 1 star and the wallpaper was it. ? So…..I went with my gut {{which told me to put up a the dark night paint chip and contemplate}} and chose Dark Night and everything fell in to place. Cascades suddenly worked and the whole room felt cohesive. YAAAAYYYY!!!! Whew!
In the end, Sherwin Williams took great care of me and made sure I had what I needed for this office project. When the color wasn’t right, they made it right.


NEXT CAME THE STENCILING
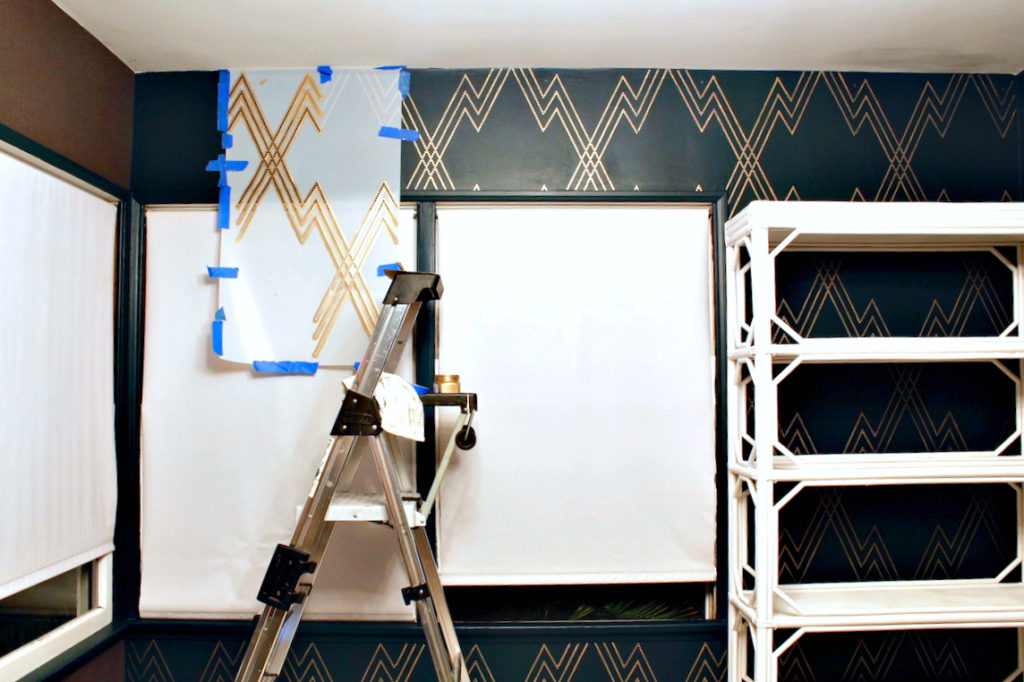
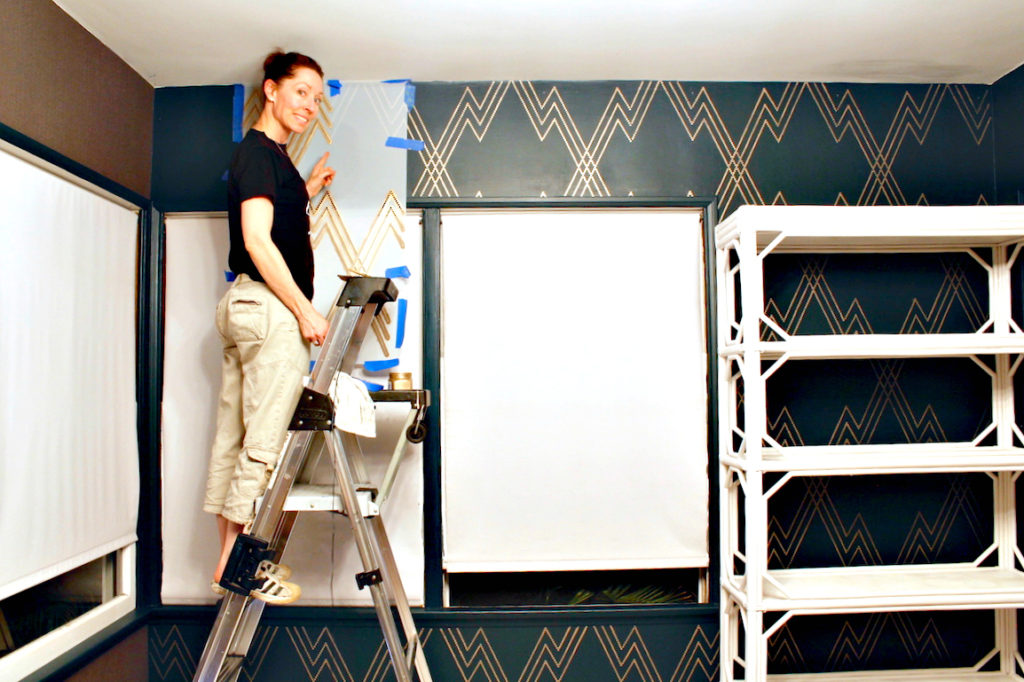
In full disclosure, this was my first time using a purchased stencil. I’ve done lots of walls where I made my own stencil and freehanded it that way, but this pattern was a bit over my head. {{ See how important it is to know when you are over your head?? ??♀️ }} So I used this Stencil Library stencil and it was honestly a lot of fun! Definitely time consuming, but having all of the right tools is key.
- Painter’s tape (to hold it up)…..or spray adhesive.
- Chalk
- Paint color of choice
- A ladder
- Stenciling brushes (these are stiff and sort of flat on the top)
- Patience ?
They recommended the spray adhesive to put it on the wall, but that stuff scares me and is incredibly toxic. Dudes, I’m on a detox right now, so last thing I need is a bunch of neurotoxins up in my nose, lol. Painter’s tape did just great!
Getting the right amount of paint on the brush is key to it not bleeding under the stencil. You get just a touch of paint on the tip of the brush, then have a piece of cardboard or something similar where you swirl the paint off until you get just a touch of the paint on the brush. You can go back and pick up more paint as you go from that cardboard until it’s too dry. This is called dry brushing.
I started the stencil with it’s side up against my window, but if you are doing a whole wall, I recommend finding your center horizontally and vertically and starting smack in the middle of the wall and working outward. Be sure to use a level on your first one so you don’t end up with a crooked pattern! This ensures that you have the same width of the pattern on side of the wall, instead of 1/2 on the right edge and a full one on the left. It always pulls the eye to the imbalance and you don’t want that!
These stencils came with little diamonds cut out on the edges of the stencil so that you could line it up to do the next part of the stencil. These kept the pattern incredibly accurate. I used chalk to fill in the diamonds so that I could find them easily and then just wipe it off when I was done.

IT AIN’T ALWAYS EASY BUT IT GOT DONE
So that is it. The last week of my office project was surely a race to the finish and I got all of this painting and stenciling done in a single week! By mahself! If I can do it, you can do it. If you are landing on this blog post and you want to see the whole project from start to finish, click on the links below.
Coming next week, keep an eye out for my shop this room post so you can recreate this room in your house, and you didn’t have to pay the $5,000 I would have charged you to design it for you. Boom! You’re welcome! {{Psst….if you don’t want to miss it, be sure that you are signed up for my email list. I’ll send you a cheat sheet where you can steal my secrets when you sign up! }}
WEEK 1 | WEEK 2 | WEEK 3 | WEEK 4 | WEEK 5 | WEEK 6 THE REVEAL | SHOP THIS ROOM (coming soon)
If you love the idea of pre-designed rooms that you can download for free it’s your lucky day! CLICK HERE to see what I have available.

PS. If you have a project you are planning that you will DIY, but you want it to look like you hired a designer, but take all the credit, a virtual consult with me may be just what you need! Go to my services page and book a consult! You would be shocked what we can accomplish in an hour or two !